Eagle CAD files for lighthouse circuit

For any one that is interested I have tidied up the Eagle CAD files for my lighthouse circuit.  You can grab them here. They’re not perfect and are probably not suitable for sending to a PCB production company but they might give you a head start of making your own version.

They’re saved from Eagle CAD version 5.6.0 so you’ll need to go to thier site to get that if you don’t have the latest version.

A little bit of help with the lighthouse circuit.

I had an email from a friend who has built my lighthouse circuit but whose LEDs were lighting up in the wrong order.  This is exactly what happened to me when I built it the first time too.  But no worries!

The great thing about charlieplexing and this circuit is that it doesn’t matter which order you place the leds on your board as you can change the code to match the correct sequence for your final layout.  This means that you can layout your circuit for ease of wiring rather than having to keep the LEDs in any particular order.  As long as the circuit is correct and that you have an LED everywhere you should have one the ordering can be sorted out later.

Continue reading

Lighthouse schematics and files

Update: I’ve revised the schematic for this project and had a proper PCB made, see the new version here.

For anyone who is interested (Hi Richard) here are my project files for the lighthouse project.

The project is written for the PIC12f683 using SourceBoost Technologies BoostC that I use as a tool suite in  Microchip’s MPLAB.  BoostC is fairly ANSI so if you’re using another C then it wouldn’t be hard to convert.  There’s a free version of BoostC too and I think my program will fit within it’s limits.

C source code here (7kb). : Compiled hex binary here (1kb zip).

The schematic and circuit are drawn up using the free version of Cadsoft Eagle. They were created using version 4, but the latest version of Eagle is v5 which I’ve not used yet, however the circuit is fairly simple so I doubt there would be any problems.
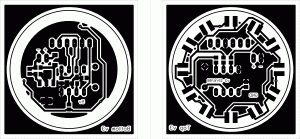
Hig resolution combined print for top and bottom of circuit.

High resolution combined print for top and bottom of circuit for toner transfer. (4800x2222px, 163Kb)
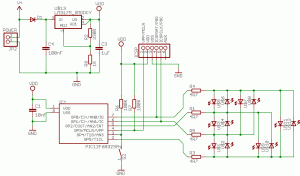
Schematic layout of circuit. Note that in the real thing I added a couple of DIP switches in the GP0 & GP1 lines just before the resistors R4 & R5 to isolate the ICSP lines when programming.

Schematic layout of circuit. Note that in the real thing I added a couple of DIP switches in the GP0 & GP1 lines just before the resistors R4 & R5 to isolate the ICSP data and clock lines when programming. (25kb)

I’ve not included the Eagle files themselves as they make use of some random parts that I’ve made in my own library.  But the circuit is not so complex that you couldn’t copy it.  If you really want them then let me know.

If you have any problems drop me a line.
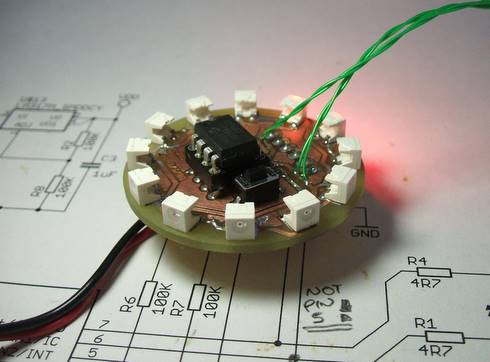
Finally got it working!

Working prototype. The DIP switches are used to isolate the ICSP clk and dat pins when programming. Only two LED are actually lit at any one time but due to the exposure time of this shot it looks like loads of them are power up.

After about a day of messing about I finally managed to program the damned thing using ICSP rather than pulling the PIC each time.

Schematics lie! Especially when you draw them yourself. Guess what. Pin 5 of the PIC12f683 isn’t the ICSP clock line… Pin 6 is! Ah! Well there’s a lesson learned the hard way. Next time I’ll be more diligent when drafting things out in Eagle.

Here’s a quick video of the thing in action. It’s a bit fast for a lighthouse, more like a beacon. I’ll slow it down and maybe add a potentiometer to allow speed changes later on. I deliberately chose the input pin to be GPIO 4 as it’s one of the IO pins that is multiplexed with the analog to digital converter.


Apologies for the manky looking video, it’s hard to get
the camera to work well in low light conditions.

Mini lighthouse LED circuit

UPDATE Aug 7th 09 : You can get the Eagle CAD files here.

UPDATE Oct 2nd 08 : You can grab the source code and circuit diagram for this project from this blog post.

I’ve been working on a variant of the circuit I developed for my Lego beacon. It’s the same basic circuit but this time with 12 rather than 8 LEDs and rebuilt into a circular 40mm dia (1.5 inch) double sided disc.

The idea is to use this as a simple “lighthouse” that when powered up will rotate the beam around the 12 LEDs. I’m not sure why I’m building it, I have no real need of a lighthouse… Maybe it could be useful for a model railway or something similar. But I kind of like the idea of it and had some neat OSRAM SIDELEDs in my parts box that were calling out for some use.

Continue reading